Introduction by Jo-Anne Lauzer
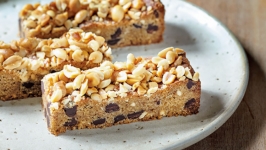
Plantcakes
Whether you are plant-curious, plant-forward, plant-adjacent or fully plant-based, Lyndsay Sung’s second cookbook, Plantcakes, is for anyone who loves making cakes. “My first cookbook, Coco Cake Land,” Sung says, “was more about decorating techniques with a few base recipes. Plantcakes has a lot more recipes and is completely plant-based.” What remains the same, however, is Sung’s playful approach to making cakes that are colourful, textured and whimsical. By offering several choices for substitutions to meet a variety of dietary preferences, Sung is passionate about showing how easy and delicious it is to bake and transform classic cakes using plant-based ingredients. Sung, a self-taught baker, also offers easy-to-follow steps, helpful tips and creative hacks such as using aquafaba to make a silky smooth dairy-free meringue or repurposing less successful cakes to make parfaits. Living in Vancouver, Sung is currently in transition and contemplating her next chapter (and possibly another book about cookies) while also finding fun content for her YouTube channel.
Preparation
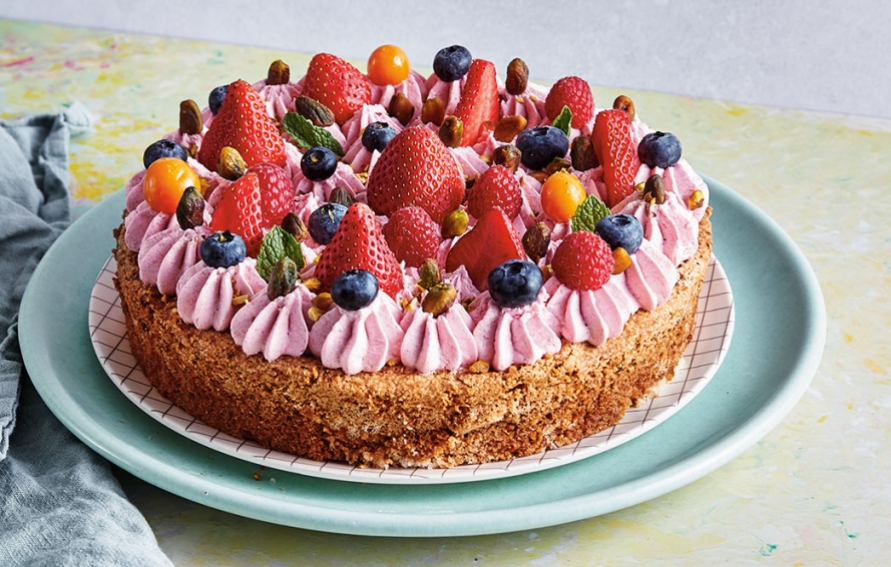
Finely ground toasted pistachios sifted with cake flour gives this beautifully nutty single-layer fancy cake its flavour. Swiss meringue strawberry buttercream is then piped on top using a large multi-pronged star tip, and the whole cake is dotted with fresh berries of all kinds, along with whole pistachios and chopped sprinkled pistachios, too, if you so desire. I used what I had in the fridge to decorate this cake, which included gooseberries and fresh mint.
Pistachio cake
½ cup soy milk
1 teaspoon apple cider vinegar
1 cup finely ground shelled toasted pistachios (you can use a food processor for the grinding)
1½ cups cake flour
1 teaspoon baking powder
¾ teaspoon fine sea salt
½ teaspoon baking soda
½ cup unsalted plant-based butter, room temperature
1¼ cups granulated white sugar
¼ cup plant-based sour cream
1 teaspoon pure vanilla extract
1 teaspoon pistachio or almond extract
Simple vanilla syrup
1 cup granulated white sugar
1 cup water
1 teaspoon pure vanilla extract (substitute almond or pistachio extract, if desired)
Filling + frosting
½ recipe
Strawberry Swiss Meringue Buttercream (recipe follows)
Fresh strawberries, sliced raspberries, blueberries and gooseberries (optional)
Fresh mint (optional) Whole pistachios
Make the cake: Preheat the oven to 350 F. Prepare a 9-inch round cake pan by spritzing it with vegetable oil and lining with a parchment paper circle, and then spritzing again to prevent sticking.
In a small bowl, mix the soy milk with the apple cider vinegar and set aside for 10 minutes to thicken. It may look a bit separated at this point, but that’s normal.
In a medium bowl, whisk together the ground pistachios, cake flour, baking powder, salt, and baking soda.
In the bowl of a stand mixer fitted with the paddle attachment, beat together the butter, sugar, sour cream, vanilla extract, and pistachio or almond extract on medium speed until combined, about 30 seconds.
With the mixer turned off, add the flour mixture to the mixer and pulse to combine. Slowly pour in the soy milk mixture and mix on low speed to combine until a batter forms, 15 to 30 seconds.
Bake the cake: Add the batter to the prepared cake pan, using an off set spatula to level and smooth the top. Give the pan a light tap on the counter to reduce any air bubbles. Bake for 35–40 minutes, until a toothpick inserted into the centre of the cake comes out with only moist crumbs. Let the cake cool completely in the pan set on top of a wire rack.
Make the simple vanilla syrup: Combine the sugar and water in a small saucepan set over medium-high heat, allowing the sugar to dissolve and the mixture to reduce, 5 to 10 minutes. Remove from the heat and stir in the vanilla extract. Let cool completely before using. The syrup can be stored in the fridge for up to 2 weeks.
Assemble the cake: Remove the cooled cake from the pan. Using a pastry brush or a teaspoon, spread a generous amount of the vanilla syrup across the top of the cake.
Dollop a generous amount of strawberry buttercream onto the center of the cake. Using your small off set spatula, frost toward the edges of the cake, leaving a half-inch of bare cake around the edge.
Fit a piping bag with a large open star tip and fill the bag with the remaining buttercream. Pipe drop stars in a circle around the border of the cake, working your way inward in circles until the entire cake is covered in piped stars. Alternate between adding sliced strawberries (and any other berry you might like) and whole pistachios to the center of each drop star. Crush up some more pistachios and sprinkle on top. Decorate further with additional berries and mint, if desired.
This cake will taste freshest eaten within a day of making it, but can be stored in the fridge, covered, for up to 3 days.
Strawberry Swiss meringue buttercream
1 recipe for Aquafaba Meringue for Swiss meringue buttercream
2 cups unsalted plant-based butter, room temperature
½ cup (30 g) freeze-dried strawberries, powdered
Pinch of salt
With the meringue in the bowl of the stand mixer, switch to the paddle attachment. With the mixer on low speed, add the butter; I use a butter knife and just slice off small pieces of butter right into the mixer. Whip on high speed until a glossy, silky frosting forms, about 1 minute.
Add the freeze-dried strawberry powder and salt and whip for another 30 seconds to combine, using a spatula to scrape down the sides of the bowl as needed.
Store any leftover buttercream in an airtight container in the fridge for up to 1 week.
Aquafaba meringue for Swiss meringue buttercream
Makes about 5 cups
For aquafaba meringue, I like to reduce the aquafaba on the stovetop first to concentrate or thicken it, adding sugar once it has reduced, to make something akin to an aquafaba syrup. After removing from it the stovetop, I let this mixture cool down on the counter, then I refrigerate it overnight, or for at least a few hours, which allows it to thicken into a gelatinous consistency. This isn’t an essential step, but it’s the method I’ve had most consistently good results with, so I recommend trying it for sure. The prepared aquafaba will start as a golden colour, then as it froths and whips, it will turn into a fluffy white meringue. Once the aquafaba has fluffed up to the soft peaks stage, you start adding the icing sugar mixed with cream of tartar in 1 tablespoon increments — cream of tartar is aquafaba’s best little buddy, helping it stabilize and stay whipped.
2 cans (18 oz/540 ml each) unsalted chickpeas
1 cup granulated white sugar
1 cup icing sugar, sifted
½ teaspoon cream of tartar
Note: The reduced aquafaba needs at least 2 hours to chill, and ideally overnight to gel, so start this meringue preparation ahead of time. It can be prepared up to 5 days in advance and stored in the fridge until needed.
Separate the aquafaba: Pour the chickpeas and their liquid into a strainer set over a medium bowl, straining the aquafaba liquid into the bowl. Reserve the chickpeas for another use.
Reduce the aquafaba: Transfer the aquafaba liquid to a small saucepan set over medium-high heat. Bring the aquafaba to a low boil (watching that it doesn’t boil over), then turn the heat down to low. Simmer the aquafaba until it is reduced by approximately half — you want to end up with roughly 1 cup of reduced aquafaba — this could take up to 15 minutes.
Once the aquafaba has reduced, remove the saucepan from the heat and add the white sugar, whisking to combine.
Chill the aquafaba: Transfer the aquafaba to a heatproof liquid measuring cup or container. Refrigerate, covered, for at least 2 hours and ideally overnight to jell. When reduced aquafaba is refrigerated, it takes on a thick gelatinous consistency. It will be a golden color and it may separate a bit, and all of this is normal.
Whip the chilled aquafaba: In the bowl of a stand mixer fitted with the whisk attachment, beat the chilled aquafaba on low speed for 3 minutes. Increase the speed to medium high and whip for 3 more minutes.
In a small bowl, sift the icing sugar and cream of tartar together. Add the mixture to the stand mixer, 1 tablespoon at a time, and continue whipping until the meringue has thickened into glossy, fi rm peaks. This may take up to 15 minutes. Leave the meringue in the bowl of the stand mixer, and continue with the method of the buttercream recipe you’re using.
Excerpted from Plantcakes by Lyndsay Sung. Copyright © 2023 Lyndsay Sung.
Photographs by Lyndsay Sung. Published by Appetite by Random House®, a division of Penguin Random House Canada Limited.
Reproduced by arrangement with the Publisher. All rights reserved.